Progress Report.

To: Sandra Jensen

From: Adam Kincaid

Date: 05/29/16

Subject: Proposal Project Progress Report.


Introduction:

My proposal is centered around adding a new technology class at the community center I work for. The class would be on how to use Arduino micro-controllers. The community center I work for lacks any real technology classes, the closest they come is a Lego robotics class for 8-13 year olds. Part of this may be due to the suspected cost of a class with discrete electrical components. Parts such as capacitors, integrated circuits, and coils can be very expensive however some of the cost for those can be eliminated by using some clever programming.


Facts and Discussion:

I am currently a little behind schedule with my project. I have been having some problems coming up with specific Arduino kits and components to mention but I am making progress and should be back on track by the end of Monday the 30th of May. I have laid some groundwork for a good chunk of the report it isn’t very long but most of it is basic details that can be more fleshed out once I have specific parts and kits selected. I have a pretty solid background section I feel. It is aimed at my boss at the community center who strives to  make the community better so I tried to appeal to that as much as possible. It is possible it would get passed onto his bosses to help him secure funding for the classes. With that being a possibility I feel focusing on the potential benefits to the community is an important point to talk about. It is possible that my boss or his bosses will know very little about Arduinos and how they could be easily adapted into a great learning tool for a class. Due to this potential lack of knowledge I will have lots of details that would seem unnecessary to someone who is familiar with Arduino but, that someone with no knowledge would find useful.

In the next week I plan to have all of the parts and kits I’m going to mention selected and the details of them integrated into my report. I will also be finding images of Arduinos, circuits, programming, and one of the community center and integrating them into my report. By the end of the week I should have some tables comparing costs of the materials as well as tables presenting two different ways the class could be paid for by youth and their families.

Conclusion:

I do not foresee any other major issues coming up with this project. There is the ever present issue of having time to get it done between school and work but, I feel that that won’t be too big of a problem this week. Once I have kits and parts selected everything should go smoothly and mostly write itself.

Proposal Project.

To: Mr. O

From: Adam Kincaid

Date: 06/05/16

Subject: Proposal for a new class.


Introduction:

I have an idea for a new class for 10-16-year-old youth at the community center. We should start an introduction to Arduino class. Arduino is a micro-controller used for prototyping and hobby level circuit design. In this class, students would learn the basics of circuit design and basic programming in a variant of the C programming language. This would give us another technology class and would give us a serious technology class as opposed to a recreational technology class.


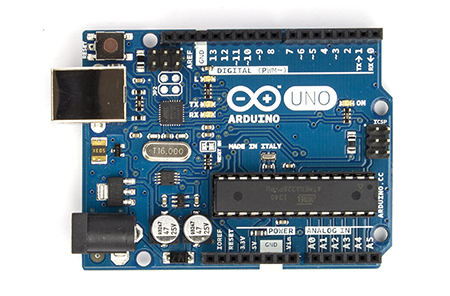
Image: Arduino Uno, Source: arduino.cc


Background:

We have only one technology class at the community center. If we are truly trying to reach as many youths as possible, we are failing miserably when it comes to the technology fields. The closest class we have to a technology class is a single Lego robotics class. We have plenty of outdoors classes, sports classes, and art classes but when it comes to technology classes Lego robotics is the only one. I believe that we are losing a large chunk of the community because we don’t offer classes that interest them.

This class would allow us to introduce youth to circuit design and programming as well as help increase interest and knowledge in these fields. It could increase interest enough to help promote the study of electronics and programming to a level that more technology companies move into the area to take advantage of the new potential workforce. This could lead to bettering the economic status of the area. We do what we can at the community center to better the community. What we have here is a chance to potentially help stimulate the local economy as well as ensure our youth don’t get left behind the technology curve due to a lack of finances.

Benefits and Feasibility:

As mentioned before this class should help raise interest in technology as well as potentially help the local economy a few years down the road. Other benefits include,

  • A new technology class
  • More diversification in classes
  • Potential for class off-shoots such as;
    • programming in a more professional language
    • digital electronics
    • analog electronics
    • higher level Arduino classes
  • potential partnerships with local technology companies

As far as feasibility goes this class is potentially very feasible. Arduino kits can be as cheap as $50 and if we get some for use at the barn and that we keep class to class the price for each term should remain low. There is a potential issue with replacing resistors, capacitors, microchips, LEDs, and wires. These won’t need to be replaced every class and could be stocked up on over time to keep the cost down. There are lots of resources online available for planning and background information.

Method:

The class will be in session once a week for five weeks with a class time of 1.5-2 hours. each class will have a main project that we focus on and try to achieve in the time allotted. If a youth finishes their project for the day early they  would be allowed to experiment with what they have already learned or accept a challenge from the instructor. I have laid out an idea of what each class would focus on below.

Week 1: We will focus on the basics of circuit design and programming. we will do this through some lecturing  to cover the basics and then work on a simple program to turn on and off an LED at different speeds.


Week 2: We will look at push buttons and how they can be used to effect variables in our programs.


Week 3: We will expand our knowledge of variables and how we can manipulate them by using a potentiometer. We will also learn about programming libraries and how to use them by using a servo motor.


Week 4: We will learn how to use a temperature sensor and how the serial monitor can be used.


Week 5: We will use all of our knowledge to build a temperature monitoring point that will have a green LED on until a certain temperature is hit. Once we reach the desired temperature a red LED will turn on, the green LED will turn off, and a servo motor will trigger to simulate a vent opening. After the temperature falls below a specified point the servo motor will reset and the red LED will turn off and the green LED will come back on.


Schedule:

This class should not take long to set up. Once we have the materials the only thing we would need to do is train any assistant teachers we may need and get the class added to the recreation guide. Below I have an outline of how long I think we will need subject to change depending on funds and when the next recreation guide is coming out.

June 20th: Kits and extra parts ordered.

June 24th-29th: Kits and extra parts received and sorted.

June 30th-July 9th: Assistant teacher training, most of this will consist of the assistant teacher working through the curriculum themselves based upon the main teachers guidance along with internet resources. It would be preferable that most of the guidance the assistant teacher receives is from the internet. This is preferable because it will hopefully yield new ways of doing the tasks.

Week of July 11th: First day of the new class. Actual day depends on the availability of the art loft.

Week of August 8th: Last day of class.


Qualifications:

My experience that qualifies me to put together this class as well as teach it is,

  • An associates degree in electronic technology
    • classes included
      • Micro-controllers
      • Programmable Logic Controllers 1-3
        • PLCs are similar to micro-controllers  but are used for more industrial purposes.
      • Digital electronics 1-2
      • Semiconductors 1-3
  • Experience teaching Lego Robotics classes
    • 1-year being an assistant teacher
    • 1-year being head teacher

In the micro-controller class, I used an Arduino kit and became proficient at programming and designing circuits for it. I did projects ranging from turning on an LED to creating a theremin controlled by two light sensitive resistors. PLCs gave me an idea of how different control systems work. this could be useful because I can give the youth an idea of how what they are doing in class is similar to what happens in industry.


Cost and required resources:

Below is a list of projected cost for this class. It excludes the purchase of computers because we already have those at the community center. All of these items are from Sparkfun because they are a trustworthy source for Arduino products and parts. I have included some spare parts on this list that I believe it would be good to have. In the future, we may have to order parts not included on this list. This list should hold us over for two sessions at least and possibly even more. the life span of some of the components is going to be entirely based on how well the youth listen and pay attention to how things are supposed to be installed. Due to that being the largest factor in component lifespan it is difficult to say how long we will have before we have to do a resupply order.

  • Arduino Kit By Sparkfun              X8                                 $399.60
  • Jumper wires                               X2                                 $49.90
  • TMP36 temperature sensors       X10                               $15.00
  • 10k trimpot with knob                  X10                               $9.50
  • Mini push button switch              X25                               $8.25
  • Total                                         55 items                        $482.25


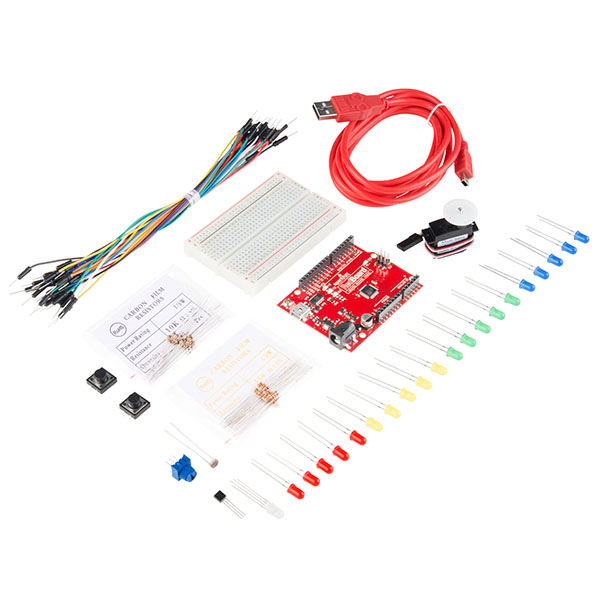
Image: Proposed Arduino kit, Source Sparkfun


Conclusion:

If we do start an introduction to Arduino class we will be able to round out our offered classes and cater to a section of youth we don’t currently cater to. This could raise interest in some of our other classes as well as lead to classes related to Arduino like introduction to programming, introduction to analog circuits, and introduction to digital circuits. We currently have one class related to technology  and starting this class would be a very good way to begin to serve that part of the community and could lead to more classes in this area of interest. It has a fairly low initial cost and could have a low operating cost and the possibility to pay for itself in enrollment fees very quickly. If you have any questions, concerns, or want to talk more in depth with me about this feel free to email or call me.


LM555 Timer Replacement Feasibility Report

Here is my feasibility report. The scenario is, I have been asked to find a suitable replacement for the LM555 timer microchips our company has been using  in our products because the company that produce these chips are discontinuing them. A LM555 timer is a chip that can be used to send out different clock pulses. When you see on a computer that it says the processor runs at 2.6 giga-Hertz it is something similar to an LM555 that is sending out a 2.6 giga-Hertz signal to keep all the other components running together and in sync.


LM555 Timer Replacement Feasibility Report

By: Adam Kincaid

4/30/2016


  The purpose of this report is to find a suitable replacement for the LM555 timers we are currently  using. Finding a replacement is a necessity due to the manufacturer discontinuing their 555 timer line of products. I will be comparing 3 possible replacements in this report. They are Texas Instrument’s LM555 (TI), Fairchild’s LM555 (F) and National Semiconductors LM555 (NS). I have narrowed it down to these 3 possibilities by looking at the chips we get from all manufacturers and comparing how often those manufacturers chips fail in the field. I will be comparing them on the criteria of rise and fall times, supply voltage, and supply current.

  The rise and fall times refer to how quickly the timer can turn its output high and how quickly it can turn its output low. The rise times are TI 100ns (nano seconds), F 100ns, and NS 100ns. The fall times are TI 100ns, F 100ns, NS 100ns. It is not surprising that all of these are exactly the same. These values were collected off of data sheets and those listed only the typical values for these categories. Since this chip has a specific purpose they would want to convey that it should be able to switch from high to low and low to high in the window we would expect from a rival chip.

  Supply voltage is the amount of voltage the chip needs supplied to it in order to operate as well as the maximum it can handle. The values I got for this category was a range of voltages. The supply voltages are TI 4.5-16V (Volts), F 4.5-16V, and NS 4.5-16V. This range is fairly typical for a chip like this 4.5V is the lower side of a digital electronics high signal and 16V is the upper side of what most integrated circuits can handle. This is a good sign that we shouldn’t have to adjust the supply voltage from what it is in our current application most likely.

  Supply current is the current that the chip needs supplied to it to run as well as the maximum it can handle. The data sheets have 2 entries for this category one for a 5V supply and one for a 15V supply, we are going to work off of the 5V supply data since it is closer to the voltage in most applications. The data I gathered was TI 3mA (milli-Amps) typically to 6mA maximum, F 3mA typically to 6mA maximum, and NS 3mA typically to 6mA maximum. Like the supply current this is a pretty typical range for electronics of a digital nature which is where you would expect to see a chip such as this.


Comparative

Table

Texas Instruments Fairchild National Semiconductor
Rise/Fall Time 100ns/100ns 100ns/100ns 100ns/100ns
Supply Voltage 4.5V min-16V max 4.5V min-16V max 4.5V min-16V max
Supply Current 3mA typical-6mA max 3mA typical-6mA max 3mA typical-6mA max


   Due to my 3 criteria having exactly the same data for all 3 chips I cannot make an accurate recommendation on which one would be best. The categories that are on the data sheets that I didn’t cover here are also exactly the same or there is negligible difference between them. Without knowing the specifications of the chip it should be able to replace as well as the information on how we have it integrated I can’t use the negligible differences as determining factors. I would recommend that we acquire 10 of each chip for each application we have them in that is unique in how it is integrated and start conducting tests to see how each one does in that specific application. After he have gathered that data we can make a more informed decision about which LM555 we should go with.


I will admit the conclusion I came to is a little underwhelming however, that is the way these things go in my field. a LM555 is a very specific chip that won’t vary much if at all from one manufacturer to another on paper. the only way to really tell a difference is to test them. I do also recognize that I stretched the definition of a feasibility report a little however, to do it properly for my field I would have to do something like, compare the cost and results of using an operational amplifier integrated circuit, and an operational amplifier made of discrete transistors, and mimicking an operational amplifier in firmware or other non physical means. This would have been really interesting to do but would have taken more than the time allotted for this project and I would have to come up with some very specific requirements of the tests so that they would be comparable in theory.

User Test Report.

Introduction: The purpose of this report is to report on the success of the testing of my instructions.  My instructions are on how to fold a towel as well as how to roll a towel. My instructions are aimed at any one and everyone and I think my test group is a fair example of who may be using the instructions.


Objectives: The objectives of my instructions are to convey how to properly fold and roll towels. The objective of my tests were to find if there were any holes in the instructions or badly worded instructions.


Method: My instructions are not going to undergo any changes from draft to final. My users didn’t report back any issues with the instructions so I see no reason to change them at this point in time. My testers were Jongwoo Won (fellow classmate), Luke Kincaid (older brother) and Hannah Kincaid (younger sister). I wish I was able to get more classmates feedback but due to my late posting of the instructions I only have one classmate’s feedback. All of the testers conducted the test at their homes which is a fitting place for the test because that is the place the testers would normally do this task. The procedure was simple I asked them to follow the instructions I had provided carefully and report to me any issues they saw in the instructions. Jongwoo posted a video of himself completing the instructions with commentary, Luke and Hannah conducted their tests in front of me and gave me direct feedback.


Results: The results I got from my testers were all good. No one had a problem that I saw or that was reported to me. I did see that Hannah was having an issue rolling the towel but she consulted my troubleshooting guide and was able to complete the task because of it.

Instructions.

   Before I begin this blog post I would like to start by apologizing to my fellow classmates as well as my instructor. I mixed up due dates in this class and another class I am currently taking and that has resulted in me not posting this assignment when I should have.I realize that in an online class such as this it is even more important that things get done on time since we are all depending on each other for feedback. This mix up of mine has also resulted in me rushing to get it done once I realized my mistake so with that said the content is a little simple but I tried to make it at least a little bit more interesting. Once again I apologize to everyone who was affected by my blunder and I will do my best to ensure it doesn’t happen again.

Here are my instructions. I believe you should be able to comment on it if not let me know and I will attempt to fix it.

Second blog post.

In my field of electrical technology I run into technical writing all the time. The most common form of technical writing I encounter is in the form of datasheets. Datasheets are documents that contain all the information you could need about a particular component from pin-outs to how the output will change with variations in temperature. Below is an example of one of the last pages found in most datasheets. These typically sum up all of the information into a grid so it can be quickly referenced. This particular one is for a 555 timer which is a very common componet in most digital electronics.

One of the last pages of a Fairchild brand 555 timers datasheet.                                                     Image obtained from datasheetq.com

Another place I encounter technical writing in my field is in travel documents for products I am testing at USNR. I work with their TriCam scanners that use a camera mounted on the top to look at the points created by diffracting a laser into a line on the bottom and firing it at the lumber to be scanned the image below is one of the models of these I typically work with. I have to separate the controller and scan head and test them individually. After I test them I create travel paperwork for each of them that includes the parts serial number and what exactly is wrong with it. The travel paperwork informs whoever receives it next what I have found and  the course of action I recommend to fix the problem.

A TriCam Sensor.                                                                                                     Image from pubweb.usnr.com

An example of a professional website in my field is datasheetcatalog.com.  This website is a depository of datasheets from many different companies and can be an invaluable resource when trying to troubleshoot or build a circuit. What I like about this particular website as opposed to other similar ones is the background isn’t just solid white. It has a circuit board design as the background which can be a nice distraction for the eyes when you are hunting for that specific part number in a long list of similar part numbers. Their home page is pretty well designed, it has seven options other than English in the top right hand corner and right in the middle of the page is a grouping of company logos of the companies they have datasheets for. These logos are links that take you right into that manufacturers datasheets.

Blog design

I chose the theme I did because it is simple and not flashy while being professional. while the background is a plain white I think the blue helps break up the page. I chose the header picture I did because I thought it would help convey a sense of learning and desire for knowledge. I still might change the design and theme of my blog. When I started the blog I was more concerned at the time with getting the assignment done than making the blog look just right. I didn’t run into many problems setting up my blog. The biggest problem I ran into was figuring out how to get the class blogs plugin on my blog. I solved this by double checking the instructions provided and looking on the forums on moodle to see if anyone else was having a similar issue.

Introduction

circuit-board-background Image: Stylized circuit board.


I am Adam Kincaid, I am 20 years old and have lived in Eugene for the last 15 years. I am pursuing an electrical technician degree at lane and am just over 1 term away from graduating. I currently work for USNR testing lumber scanning equipment. USNR is a large international company that produces a wide range of equipment for lumber production from saw blades to scanning equipment to gauge the quality of the lumber.. I run into technical writing at work a lot on design documents, travel papers for products in testing and test documentation. I also use technical writing in my personal life when filling out taxes and working on my personal budget. I am hoping to become a better technical writer with this class since technical writing is very important in my current job. I am taking this course online to open up make room in my schedule to go to school and work.

After I graduate I am planning on getting an electrical engineering degree. I am not sure were I want to get it from as far as universities go but I have a bit to figure that out. As far as what I will do after I get my degree I’m unsure what specific area I want to go into. Digital electronics are interesting and popular, analog electronics are always a puzzle, and communication electronics are a merging of analog and digital. Even deciding between those doesn’t really narrow it down because there are many sub-categories in each of those areas to decide between.


circuit-board-background

Image: http://www.psdgraphics.com/backgrounds/circuit-board-background/